PSP Integration
Get MarkdownHands In PSP Integration Documentation
Table of Contents
Introduction
The aim of this documentation is to guide orchestrators and payment service providers (PSPs) through the process of integrating the Hands In Merchant API.
For PSPs & Orchestrators - Integrating Hands In will require a mutual integration.
-
Hands In will integrate with your payments API to continue processing individual payments through your platform. We will reach out for your documentation to start.
-
Once that’s complete, you will integrate the Hands In API to offer split payments to your merchants, so they can offer the functionality to their customers.
Integration Flow Overview
Quick steps to get integrated with Hands In!
- Create an account and connect a payment processor
- Create a payment session via the Hands In API
- Subscribe to webhook notifications
- Testing Your Integration
- Going Live
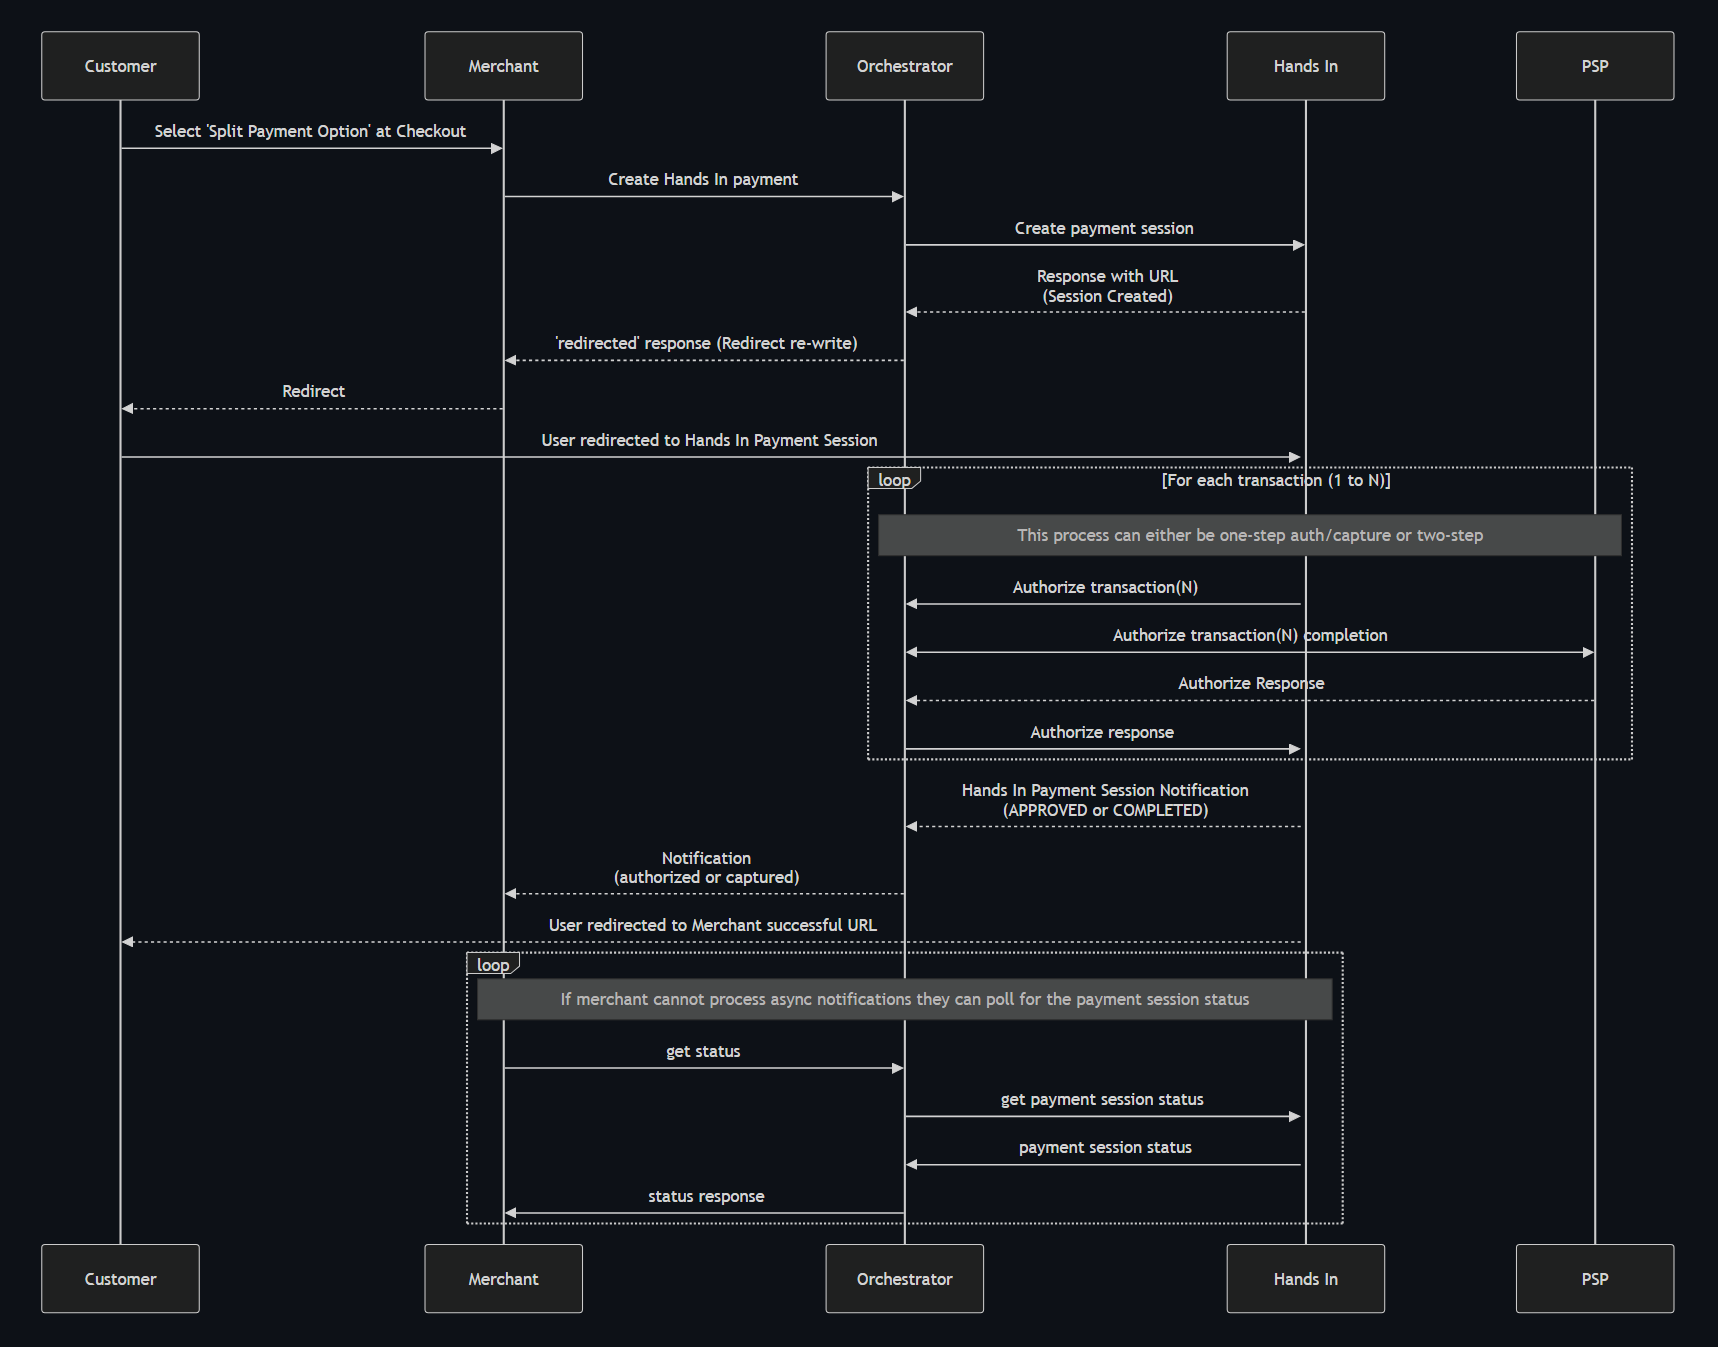
For a visual overview on how transactions are carried out through all parties.
Getting Started
To begin, sign up for a Hands In account or login if already have one.
Create a Merchant Account
Once logged in, you'll need to create a merchant account by providing a few key details for your business.
Connect a Payment Processor
To start creating payments, you’ll need to connect a payment processor to your merchant account.
Select your payment processor from the available connections and follow the steps to connect.
If your preferred processor isn't available but you’d like to begin testing, we recommend connecting Stripe. It allows you to skip entering credentials, whilst allowing you to start creating payments through Hands In.
API Authentication
All requests to the Hands In API must be authenticated using your Merchant API key.
Sandbox vs Live Environments
Hands In provides two separate environments for integration/testing (Sandbox) and production (Live).
| Environment | Base URL | Real Transactions | Purpose |
|---|---|---|---|
| Sandbox | https://api.sandbox.handsin.com/v1 | ❌ No | Used for testing and development. No real payments are processed. |
| Live | https://api.handsin.com/v1 | ✅ Yes | Used in production. All requests are processed as live transactions. |
Key Differences
-
Authentication: Each environment uses its own Merchant API keys.
-
Webhooks: You'll need to configure webhooks separately for each environment via Developers > Webhooks.
-
No Real Charges in Sandbox: The Sandbox API simulates payment flows, and no live transactions are made.
-
Same API Structure: Both environments use the same endpoints, request formats, and response structures — making it easy to move from testing to production.
Obtaining Your Merchant API Key
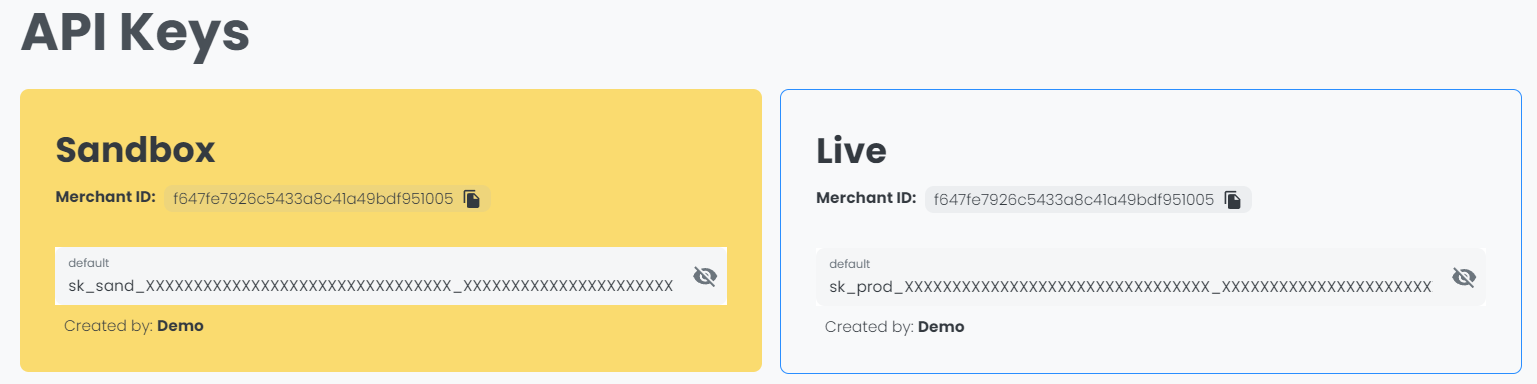
Once you have created a merchant account, you can retrieve your Merchant API key from Developers > API Keys.
Make sure to use your sandbox Merchant API key during integration and testing—not your live key.
Using Your Merchant API Key
To authenticate requests, include your merchant's Merchant API key under the x-api-key header in your request headers.
POST /v1/group-payments
Host: api.sandbox.handsin.com
x-api-key: YOUR_SANDBOX_MERCHANT_API_KEY
Content-Type: application/json
Accept: application/json
Group Payment Sessions
Group payments allow multiple participants to contribute toward a group total. You can initiate a group payment session then redirect the lead customer to a shared checkout URL, so they can pay their share and invite others to pay.
Group payments support a variety of split methods. These docs will cover split by item as it is the most used, and it can also be more complex than the others.
How to create a group payment session
You can create a group payment session by sending a POST request to https://api.sandbox.handsin.com/v1/group-payments
📗 See the Create Group Payment API reference documentation for detailed parameter descriptions and usage.
💻 Examples to create a group payment session using popular programming languages can be found via our docs
Create Group Payment Example Request Headers
POST /v1/group-payments
Host: api.sandbox.handsin.com
x-api-key: YOUR_SANDBOX_MERCHANT_API_KEY
Content-Type: application/json
Accept: application/json
🔐 Authentication Required:
Be sure to include your sandbox Merchant API key in the request headers using the
x-api-keyfield.
Create Group Payment Example Request Body
{
  "idempotencyKey": "example_unique_idempotency_key",
  "customer": {
    "firstName": "example",
    "email": "example@handsin.com"
  },
  "amountMoney": {
    "amount": 2000,
    "currency": "GBP"
  },
  "lineItemParams": [
    {
      "item": {
        "name": "Example LineItem",
        "amountMoney": {
          "amount": 1000,
          "currency": "GBP"
        }
      },
      "quantity": 2
    }
  ],
  "splitType": "BY_ITEM",
  "expirationDate": "2025-04-24T11:43:44.000Z"
}
expirationDate uses ISO 8601 format. While it's an optional field, we recommend setting it in production to ensure group sessions expire when expected.
Create Group Payment Example JSON Response
{
  "merchantId": "your-merchant-id",
  "id": "example-group-payment-id-123",
  "ownerId": "example-customer-id-01",
  "status": "PENDING",
  "memberIds": ["example-customer-id-01"],
  "invited": [],
  "memberPayments": {},
  "splitType": "BY_ITEM",
  "itemAllocation": {},
  "lineItems": [
    {
      "item": {
        "name": "Example LineItem",
        "amountMoney": {
          "amount": 1000,
          "currency": "GBP"
        },
        "id": "example-item-1"
      },
      "quantity": 2,
      "subtotalMoney": {
        "amount": 2000,
        "currency": "GBP"
      },
      "totalMoney": {
        "amount": 2000,
        "currency": "GBP"
      }
    }
  ],
  "totalMoney": {
    "amount": 2000,
    "currency": "GBP"
  },
  "amountMoney": {
    "amount": 2000,
    "currency": "GBP"
  },
  "expirationDate": "2025-04-24T11:43:44.000Z",
  "url": "https://checkout.sandbox.handsin.com/r/example-group-payment-redirect-id",
  "createdAt": "2025-04-23T11:43:44.000Z",
  "updatedAt": "2025-04-23T11:43:44.000Z",
  "enablePartialPayment": false,
  "customerUrl": "https://checkout.sandbox.handsin.com/g/example-group-payment-id-123/group-dashboard?mid=your-merchant-id&cid=example-customer-id-01"
}
📗 See the Create Group Payment API reference documentation for detailed parameter descriptions and usage.
id: The unique identifier for this group payment session.customerUrl: This is the Hands In-hosted checkout link where you can redirect your customer to complete the payment.autocomplete: Only set tofalseonly if you want to manually complete the session via the API or our dashboard.enablePartialPayment: Only set totrueonly if you want to automatically capture payments as customers make them.
How to fetch a group payment session
You can fetch information about a group payment session by sending a GET request to https://api.sandbox.handsin.com/v1/group-payments/:groupPaymentId
Where :groupPayment is the id of the group payment session you wish to fetch.
Fetch Group Payment Example Request Headers
GET /v1/group-payments/{groupPaymentId}
Host: api.sandbox.handsin.com
x-api-key: YOUR_SANDBOX_MERCHANT_API_KEY
Accept: application/json
Fetch Group Payment Example Response Body
{
  "merchantId": "your-merchant-id",
  "id": "example-group-payment-id-123",
  "ownerId": "example-customer-id-01",
  "status": "PENDING",
  "memberIds": ["example-customer-id-01"],
  "invited": ["example-customer-id-02", "example-customer-id-03"],
  "splitType": "BY_ITEM",
  "itemAllocation": {},
  "lineItems": [
    {
      "totalMoney": {
        "amount": 400,
        "currency": "GBP"
      },
      "subtotalMoney": {
        "amount": 400,
        "currency": "GBP"
      },
      "item": {
        "name": "Example LineItem",
        "id": "example-item-1",
        "amountMoney": {
          "amount": 100,
          "currency": "GBP"
        }
      },
      "quantity": 4
    }
  ],
  "totalMoney": {
    "amount": 400,
    "currency": "GBP"
  },
  "amountMoney": {
    "amount": 400,
    "currency": "GBP"
  },
  "url": "https://checkout.sandbox.handsin.com/r/example-group-payment-redirect-id",
  "createdAt": "2025-04-23T15:25:27.000Z",
  "updatedAt": "2025-04-23T15:25:27.000Z",
  "enablePartialPayment": false
}
How to add group members
You can add additional members into the group by adding the invites field into your create group-payment request.
invites accepts an array of customer creation objects. The only required field is firstName. You will encounter an error if you provide duplicate email/phone numbers.
{
  "invites": [
    { "firstName": "member2" },
    { "firstName": "member3", "email": "member3@handsin.com" }
  ]
}
How to pre-allocate items
If applicable, you'd ideally want to pre-allocate items to customers in the group. This means when they are redirected to the checkout, the items they pay for are already assigned to them and the owner doesn't have to assign items themselves.
Section Overview
- How to create items when creating the group
- How to pre-allocate items to the group owner
- How to pre-allocate items to a group member
Firstly, you must use our item endpoint to create items beforehand and then later pass those item.id's into the create-group-payment request via the lineItemParams, itemAllocation and invites fields.
How to create items
To create an item, you must send a POST request to https://api.sandbox.handsin.com/v1/items
📗 See the Create Item API reference documentation for detailed parameter descriptions and usage.
Create Item Example Request Body
{
  "name": "Example Item",
  "amountMoney": {
    "amount": 2000,
    "currency": "GBP"
  }
}
Create Item Example Response
{
  "id": "example-item-id-1",
  "name": "Example Item",
  "amountMoney": {
    "amount": 2000,
    "currency": "GBP"
  }
}
You will need to do this for each item you wish to pre-allocate in the group.
Pass Created Items Into LineItemParams
Be sure to pass each item.id and the total quantity of that item into the lineItemParams field in your create-group-payment request, like so:
{
  "lineItemParams": [
    { "item": "example-item-id-1", "quantity": 4 },
    { "item": "example-item-id-2", "quantity": 2 }
  ]
}
How you allocate items will depend on who you are allocating items to.
Either you are allocating items to:
- the
group ownervia thecustomerfield - or a
group memberbeing added via theinvitesfield
How to pre-allocate items to the group owner
In order to pre-allocate items to the group owner. You must do two steps:
- You must create the customer before the group using our
customerendpoint, and pass thiscustomer.idinto yourcreate-group-paymentrequest via thecustomerfield. - You must provide the
itemAllocationfield within thecreate-group-paymentrequest to allocate items to the owner on group creation.
How to create a customer
To create a customer, you must send a POST request to https://api.sandbox.handsin.com/v1/customers
📗 See the Create Customer API reference documentation for detailed parameter descriptions and usage.
Create Customer Example Request Body
{
  "firstName": "Example",
  "lastName": "Customer",
  "email": "example@handsin.com",
  "phoneNumber": "+447777777777",
  "language": "en"
}
Create Customer Example Response Body
{
  "id": "example-customer-id-123",
  "firstName": "Example",
  "lastName": "Customer",
  "email": "example@handsin.com",
  "phoneNumber": "+447777777777",
  "language": "en"
}
You can now pre-allocate items to the created customer that will be the group owner.
- You must pass the
idfrom thecreate-customerresponse into thecustomerfield, which dictates who thegroup ownerwill be. - You must also pass the
itemAllocationfield into thecreate-group-paymentrequest to map the group owner to items you wish to allocate them.
{
  "idempotencyKey": "example_unique_idempotency_key",
  "splitType": "BY_ITEM",
  "customer": "example-customer-id-123",
  "amountMoney": {
    "amount": 2000,
    "currency": "GBP"
  },
  "lineItemParams": [
    { "item": "example-item-id-1", "quantity": 4 },
    { "item": "example-item-id-2", "quantity": 2 }
  ],
  // in this example, we have allocated 2 quantity of item 1 to the group owner
  "itemAllocation": {
    ["example-customer-id-123"]: [{ "item": "example-item-id-1", "quantity": 2 }]
  }
}
How to pre-allocate items to a group member
You can pre-allocate items to others being added into the create-group payment request via the invites field.
You will just need to pass the corresponding item id's into each invite allocation field, like so:
{
  "invites": [
    {
      "firstName": "member2",
      "allocation": {
        "items": [
          { "itemId": "example-item-id-2", "quantity": 1 },
          { "itemId": "example-item-id-1", "quantity": 2 }
        ]
      }
    },
    {
      "firstName": "member3",
      "email": "member3@handsin.com",
      "allocation": {
        "items": [{ "itemId": "example-item-id-2", "quantity": 1 }]
      }
    }
  ]
}
Congratulations! You should now be able to create group payments with items that have been pre-allocated to members in the group.
If you still need additional support, have questions or encounter any issues, please refer to our support section
Multi Card Payment Sessions
A Multi-card payment session allows a single customer to split the total across multiple payments instead. This is ideal for scenarios where a customer wants to divide a purchase between personal and business cards, or across different payment methods.
How to create a multi-card payment session
You can create a multi-card payment by sending a POST request to https://api.sandbox.handsin.com/v1/multi-card-payments
📗 See the Create Multi-card API reference documentation for detailed parameter descriptions and usage.
💻 Examples to create a multi-card payment using popular programming languages can be found on our docs
Create Multi Card Example Request Headers
POST /v1/multi-card-payments
Host: api.sandbox.handsin.com
x-api-key: YOUR_SANDBOX_MERCHANT_API_KEY
Content-Type: application/json
Accept: application/json
🔐 Authentication Required:
Be sure to include your sandbox Merchant API key in the request headers using the
x-api-keyfield.
Create Multi Card Example Request Body
{
  "idempotencyKey": "example_unique_idempotency_key",
  "amountMoney": {
    "amount": 1000,
    "currency": "GBP"
  },
  "customer": {
    "firstName": "Example",
    "lastName": "Customer",
    "email": "example@handsin.com",
    "phoneNumber": "+447232323",
    "language": "en"
  }
}
Create Multi Card Example JSON Response
{
  "id": "example-multi-card-id-123",
  "amountMoney": {
    "amount": 1000,
    "currency": "GBP"
  },
  "totalMoney": {
    "amount": 1000,
    "currency": "GBP"
  },
  "status": "PENDING",
  "autocomplete": true,
  "enablePartialPayment": false,
  "url": "https://checkout.sandbox.handsin.com/r/example-multi-card-redirect-id",
  "customerId": "example-customer-id",
  "merchantId": "your-merchant-id",
  "createdAt": "2025-04-23T10:27:14.000Z",
  "updatedAt": "2025-04-23T10:27:14.000Z"
}
📗 See the Create Multi-card API reference documentation for detailed parameter descriptions and usage.
id: The unique identifier for this multi-card payment session.url: This is the Hands In-hosted checkout link where you can redirect your customer to complete the payment.autocomplete: Only set tofalseonly if you want to manually complete the session via the API or our dashboard.enablePartialPayment: Only set totrueonly if you want to automatically capture payments as customers make them.
How to fetch a multi-card payment session
You can fetch information about a multi-card payment session by sending a GET request to https://api.sandbox.handsin.com/v1/multi-card-payments/:multiCardId
Where :multiCardId is the id of the multi-card payment session you wish to fetch.
Fetch Multi Card Example Request Headers
GET /v1/multi-card-payments/{multiCardId}
Host: api.sandbox.handsin.com
x-api-key: YOUR_SANDBOX_MERCHANT_API_KEY
Accept: application/json
Fetch Multi Card Example Response Body
{
  "id": "example-multi-card-id-123",
  "amountMoney": {
    "amount": 1000,
    "currency": "GBP"
  },
  "totalMoney": {
    "amount": 1000,
    "currency": "GBP"
  },
  "status": "PENDING",
  "autocomplete": true,
  "enablePartialPayment": false,
  "url": "https://checkout.sandbox.handsin.com/r/example-multi-card-redirect-id",
  "merchantId": "your-merchant-id",
  "customerId": "example-customer-id",
  "createdAt": "2025-04-23T10:27:14.000Z",
  "updatedAt": "2025-04-23T10:27:14.000Z"
}Webhooks
Webhooks allow your system to receive real-time notifications from Hands In when key events occur, such as when a single payment is made or when a group/multi-card payment completes. Instead of polling the API, you can subscribe to specific events and perform your business/reconciliation logic immediately when they happen.
Setting Up Webhooks
🔒 Your webhook URL must be publicly accessible over HTTPS. Localhost or private network addresses are not supported. You can use tunnel services like ngrok to test in localhost.
To configure webhooks:
- Login to the Hands In dashboard
- Navigate to Developers > Webhooks
- Add a new webhook URL (must use HTTPS)
- Select the events you wish to subscribe to.
- Save the configuration
Once saved, for any subscribed events that occur, a notification will be sent via a POST request with the relevant event data.
Webhook Event Format
Hands In will send a POST request to your configured endpoint with a JSON payload.
{
  "id": "example-event-id",
  "merchantId": "your-merchant-id",
  "eventType": "GROUP_PAYMENT_CREATED",
  "groupPaymentId": "example-group_payment_id_123",
  "data": "{...groupPaymentData}",
  "createdAt": "2024-04-22T14:32:15Z"
}
data contains the full JSON payload of the related resource (e.g., group payment, multi-card payment).
Subscribing to Webhook Events
Hands In provide merchants the ability to subscribe to a range of events including customers, group payments, multi-card payments, individual payments, refunds and more.
See full list of webhook events here
Webhook Signatures (Optional)
Each webhook event sent by Hands In includes a x-handsin-signature in the webhook request's header. This signature allows you to verify that the request originated from Hands In.
Every webhook URL is associated with a unique signing key. You can retrieve your signing key from the Webhooks page. Keep this signing key secret safe and never expose it publicly.
Reconciliation
To help you reconcile payments in your system and ours, we allow you to pass your own referenceId when creating group-payments and multi-card payments.
This referenceId applies to individual payments made and it differs slightly between group-payments and multi-card payments.
Reconciling Payments in a Group Payment
Each payment made into a group payment session will have its own unique referenceId.
The default format for each payment referenceId is {groupPaymentId}_{customerId}, where:
groupPaymentIdis the ID of the group payment session.customerIdis the ID of the customer who the payment is for.
You can override the default referenceId on payments under a group payment session by passing your own unique-reference-id into the create-group-payment request via the referenceId field.
Example Request Body
{
  // ...restOfCreateGroupPaymentParams,
  "referenceId": "UNIQUE-REFERENCE-ID"
}
This would result in the referenceId on payments under a group payment session being UNIQUE-REFERENCE-ID_CUSTOMER-ID-123. You can lookup payments by referenceId in the Hands In dashboard.
Reconciling Payments in a Multi Card
Each individual payment made as part of a multi-card session will have its own unique referenceId.
The default format for each payment referenceId is {multiCardId}_{paymentIndex}, where:
multiCardIdis the ID of the multi-card payment session.paymentIndexindicates the order in which the payment was made (starting from 1).
You can override the default referenceId on payments under a multi-card payment session by passing your own unique-reference-id into the create-multi-card-payment request via the referenceId field.
Example Request Body
{
  // ...restOfCreateMultiCardParams,
  "referenceId": "UNIQUE-REFERENCE-ID"
}
This would result in the referenceId on payments being UNIQUE-REFERENCE-ID_1, UNIQUE-REFERENCE-ID_2, UNIQUE-REFERENCE-ID_3 and so on. You can lookup payments by referenceId in the Hands In dashboard.
Errors
The Hands In Merchant API returns standard HTTP status codes along with detailed, structured error messages.
All errors follow a consistent format to make it easier to understand what went wrong and how to potentially resolve the issue. This also helps with logging, support, and monitoring across your systems.
Error Format
Error object properties may differ slightly depending on the error. name and http_status_code are always defined.
{
  "error": {
    "http_status_code": 422,
    "name": "INVALID_FIELD",
    "detail": "The following fields have errors requestBody.amountMoney",
    "moreInfo": "Help is available at tech@handsin.com",
    "instance": "group-payments",
    "problems": {
      "requestBody.amountMoney": {
        "message": "amountMoney' is required"
      }
    }
  }
}
Error Codes
The Hands In API uses standard 4xx and 5xx HTTP status codes to indicate that an error has occurred.
Client Errors (4xx)
These errors are caused by issues with the request and typically require changes on your side.
| HTTP Status | Error Name | Description |
|---|---|---|
| 400 | INVALID_FIELD | The request is invalid, due to being malformed or missing fields |
| 401 | UNAUTHORIZED | Authentication failed. Check your API key or token. |
| 403 | FORBIDDEN | The request was not allowed for a specific reason. More info found in detail |
| 404 | NOT_FOUND | The requested resource could not be found. Check the URL you are requesting |
| 409 | CONFLICT | The request could not be completed due to a conflict (e.g. race condition). |
| 422 | UNPROCESSABLE_ENTITY | Missing required fields or one or more fields were not valid. |
| 429 | TOO_MANY_REQUESTS | The user has sent too many requests in a given amount of time. |
Server Errors (5xx)
These errors are caused by issues on our side. These are typically transient and may succeed if retried.
| HTTP Status | Error Name | Description |
|---|---|---|
| 500 | INTERNAL_SERVER_ERROR | An unexpected internal error occurred. |
| 502 | BAD_GATEWAY | API service is unavailable. |
| 503 | SERVICE_UNAVAILABLE | API service is temporarily unavailable. Retry with exponential backoff. |
Support
We're here to help ensure your integration with Hands In is smooth, secure, and reliable.
If you need additional assistance with onboarding, integrations, feature requests or any issue, please contact us via the support channels below.
Contacting Us
- Business Hours: Monday to Friday, 09:00 – 18:00 (GMT time)
- Email: tech@handsin.com
- Slack: If you use slack, we can also invite you to a direct channel to our team. Just ask us to be added!
⏱️ We aim to respond to all inquiries within one business day. Critical production issues are prioritized.
When Contacting Support
To help us assist you as quickly as possible, please include the following (if applicable):
- Your Merchant ID
- The endpoint or feature you're using
- The full error message or response body received or a brief description on how to reproduce the error